Monday 7 December 2009

Week 12

Last week of term and the end of a 12 week course. I enjoyed it so much I signed up for another 12 weeks. Not much work done today as we had a small bring and share Xmas lunch first.


I marked a proposed plinth shape on the new piece of stone and cut (with a saw) a couple of pieces off the sides to straighten up the edges.


I drew on the stone my idea for the shape to go on top of the plinth but I'm not definite about this yet.


I'm going to see over Xmas if I change my mind and decide to put something else on top of the plinth.


I gave one of the sides of an offcut a bit of a polish to see what colour it would be when it is finished.


Tuesday 1 December 2009

Week 11

You probably won't be able to see any difference in the wooden head this week. I just did some very minor fine tuning and added some detailing to the chest (like the real one in the British Museum).

I'm going to stop there and just take it home and stain it. I must remember to post a picture when that is done.


The rest of this week I spent making a maquette of an idea I had for the piece of stone I picked last week.


The maquette is a very rough idea, not to scale or anything.


The main idea was to have a plinth carved in the stone and some sort of shape on top (all carved together out of the one piece of stone).


I'm not sure if the shape on top works. The idea doesn't seem to be impresssing the few people I've shown a sketch of it. Also some parts of it might be a bit hard to carve (a challenge might be a good thing though).


Friday 27 November 2009

Week 10

3 hours of fine tuning with chisels and a little bit of sanding in the places a chisel couldn't quite reach.


I think I'm nearly finished on it now. I'm realising that you can just go on fiddling forever if you don't stop yourelf at some point.


I like the front view better than the profile.


A little bit more fine tuning and them some stain or polish next week.


I have selected a piece of soap stone from the 'stone room' at Mary Ward to potentially be my next project. Some pictures are shown below. I don't have an ideas what to do with it yet. I hope it inspires me.


Monday 16 November 2009

Week 9

Just did lots of chiselling this week really to fine tune the features etc.


I think the nose is a bit bent which I like because so is mine!


I think the mouth protrudes too much still so need to take that back a bit. It looks like he/she is pursing his/her lips.


Not sure whether to add arms at the side or some chest features at the front.

I like the photo above. I think I will leave it with the rough chiselled finish and not sand it (not all over anyway).

Thursday 12 November 2009

Week 8

For some reason I don't feel as if I got very far this week. I just did lots of fiddling.

I've given the nose a bit of shape but I think it's far too big and will have to be reduced in size.


I'm not happy with the chin either.


Lots more work to do next week. I will be happy now if I can finish it to some degree by the end of term.


Tuesday 3 November 2009

Week 7

This week was just lots of work with the chisel plus a little bit of sawing. Very satisfying though as I'm really starting to get the shape and see the features.


I'm finding the wood really nice to work with. It doesn't have very strong grain though so probably doesn't look very exciting.


The nose isn't looking very elegant so I'm thinking of slimming it down a bit.


At the moment at really like the rough marks the chisel leaves in the wood so am tempted not to file/sand it smooth at the end.

Lots more work to do!

Tuesday 27 October 2009

Week 6

I built up a sweat this week with lots of sawing and some chiselling.

This is the back. It is the only bit with any strong grain.


This is the front. Not much to see from this angle really.


The two side views give you a better idea of where I'm heading. I'm quite pleased with what I've achieved this week.


Tempting to just leave it here! It doesn't look anything like an Easter Island Head but is interesting in it's own way!


Wednesday 21 October 2009

Week 5

While I think about whether I want to put any finishing touches to the stone sculpture or leave it as it is I started on a new sculpture. Out of wood this time.


I spent almost 2 hours making a maquette out of clay for this project (picture to follow - forgot again).


I also forgot to take pictures of the piece of wood before I started work on it but I only did a little bit of work on it this week.


I made several saw cuts and started some work on the back of the piece with a chisel.

Thursday 15 October 2009

Week 4

This week was 3 hours solid sanding and polishing. Not quite as satisfying as last weeks filing.


I used 3 grades of wet and dry sandpaper. Starting with the coarsest (obviously) and working my way down to the finest.


Then I did some polishing. With Brasso in this case as that was all that was available.

Unfortunately it's not until you start polishing that you realise you haven't done enough sanding in places and have to go back to sanding again. I think it's about as smooth as I want it now though. I don't want it to look machined!


I've decided that it's more or less finished now unless I decide to do something else with the base (as that has not really had any work done on it).


I realised that you might not get an idea of the size of sculpture from any of my previous photos so have included this one with a coffee mug to give an idea of scale.

Friday 9 October 2009

Week 3

A very satisfying week despite the fact it was 3 hours solid filing. No sawing or chiselling (which is frankly more enjoyable).


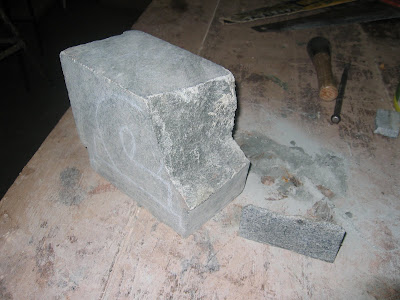
This is the view from the back which I didn't file to such a sharp point as the front. I was a bit afraid that I might make the point at the top too fragile and break it off. That would be very depressing after all this work.


Hopefully what I'm trying to create is becoming a bit clearer now?!?

This is the front view. Fairly symmetrical I hope?!?


For the last 10 minutes of this week I changed to a less course file to make the surface smoother. I'm undecided what to do with the base at this point. I might just leave it as it is to illustrate what the shape and texture of the stone before I started to work on it. I could do something with the upper surface to make it look something like water (I don't know how though). Or possibly making the shape more like the upper part and smoothing it all off.
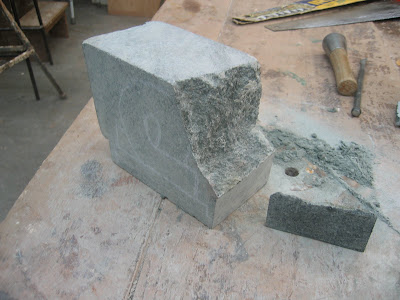

Week 2

Started to use a large file to create the shape here. It's amazing how much of stone the file removes. Apparently it's better than using a chisel because chiselling sends shockwaves through the stone and could spoil the finish of the completed sculpture.


I lowered the base a bit more at the beginning of week 2 by taking another section out with the saw. I decided the base looked too chunky.


The felt tip line was to stop me taking too much off one side or the other with the file.


Week 1

Unfortunately I don't have any photos of the piece of stone before I started. These pictures were actually taken at the beginning of week 2 of the course as I didn't have my camera with me the 1st week.
We were asked to look at the piece of stone from all angles before we did anything and see if it suggested anything to us (real or surreal). It immediately suggested a shape from nature to me which hopefully will be recognisable as I work on it.

I had cut out 1 large piece of the stone with a saw at this stage but placed it back just for the photo. I had also experimented using the chisel on the back.


It is (apparently) a piece of white English alabaster weighing about 7Kg.


Quite a soft stone.


Just in the edge of the picture here is the maquette I made out of clay before starting on the stone. This was made by cutting a lump of clay approximately the same shape as the piece of stone (but smaller). I should take some seperate photos of the maquette.